Oval tables vary greatly in shape and are less common than round and square tables. To make an oval tablecloth at home can be a little laborious but not that difficult task. This article will share a step-by-step DIY guide with you to make an oval tablecloth at home. Read on to know!
Step 1: Measurements to Make an Oval Tablecloth
The initial step is to measure and note the dimensions of your oval table. The length and width of the tables are different for different tables. The procedure that we will discuss is the same for all tables, varying only in length and width. Tables can be large or small, but their setup, i.e., the oval shape, is almost the same. To take the measurements, you need to put the cloth on the table and mark its length and width.


Measure Length
After measuring your table’s length, add the inches you want for the length of the drop cloth (multiplied by 2). Also, don’t forget to add it one inch for the hem. You can choose the length of your table to be medium, short, or floor length drop.
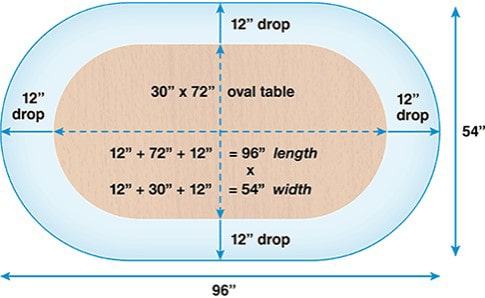
Take inches anywhere between 10 to 12 in case of short drops. You need almost 16 to 24 inches for medium-length drops while 28 to 30 inches for maximum drops to the floor. These are rough estimates, so it would be best if you sit at your table and determine the drop factor you like best.
Measure Width
The second step is to note and measure the table’s width (remember we are talking about an oval table). Here again, add inches for the drop factor by the same method mentioned above. In case you desire two panels of the oval table cloth, increase one more inch. Don’t forget to mark.
Step 2: Cut the Cloth
After taking the measurements, cut the fabric as per the measured length and width. Don’t forget to cut from the areas that you marked.

Step 3: Sew it
Here comes the most interesting step the sewing. To make a suitable width for the table, stitch 2 or 3 pieces of cloth together. Pin these fabric pieces together with the help of common pins or needles may be. However, skip this step if your oval is not wide and the table is smaller. Attach your table cloth parts (main cloth and drop length) using a 1/2-inch seam allowance. Stitch the cloth properly to make the curves clear.
Step 4: Mark the Fabric in Oval Shape
After sewing the cloth to attach the parts, center the table cloth on your oval table. Use a heavy object to put on fabric so that it doesn’t change its place, and you can take your markings easily with the help of chalk, mark by circularly moving around the table. You will get circular lines around the fabric (in an oval-like shape) cut along these lines.

Tip
For an oval (or round table), go for a narrow hem as it helps make the curved edge.
Step 5: Final Stitching to Make an Oval Tablecloth
Again, take the cloth to your sewing machine and start stitching around the bottom edges folding the cloth/hem by 1/2-inch. After stitching the bottom edge, turn below again by ½ inch and start stitching down the middle of the fold.
The table cloth for your oval-shaped table is ready. Press the cloth and spread it on your table nicely. That’s it! Make as many table clothes as you want, and share this DIY to make an oval tablecloth at home with your friends and family.